Getting started with gVisor support in Falco

In version 0.32.1, Falco first introduced support for gVisor. So, what is it and how can we use it?
gVisor, quoting the official documentation, is an application kernel that provides an additional layer of isolation between running applications and the host operating system. It delivers an additional security boundary for containers by intercepting and monitoring workload runtime instructions in user space before they can reach the underlying host.
Falco, on the other hand, works by monitoring runtime system calls, normally in kernel space via a kernel module or an eBPF probe, that are then evaluated against the flexible and powerful Falco rule engine and so used to trigger security alerts.
Before 0.32.1, Falco could not work with gVisor monitored sandboxes because it is not possible to install a kernel module or eBPF probe in such an environment. But wouldn't it be great to leverage the stream of system call information that gVisor collects through its powerful monitoring system directly in Falco? This is exactly what became possible since gVisor released version 20220704.0 and Falco 0.32.1.
In this article, you will learn:
- ✨ The magic that allows Falco and gVisor to work together
- 🚀 How to run Falco with gVisor on your host with Docker
How Falco and gVisor work together
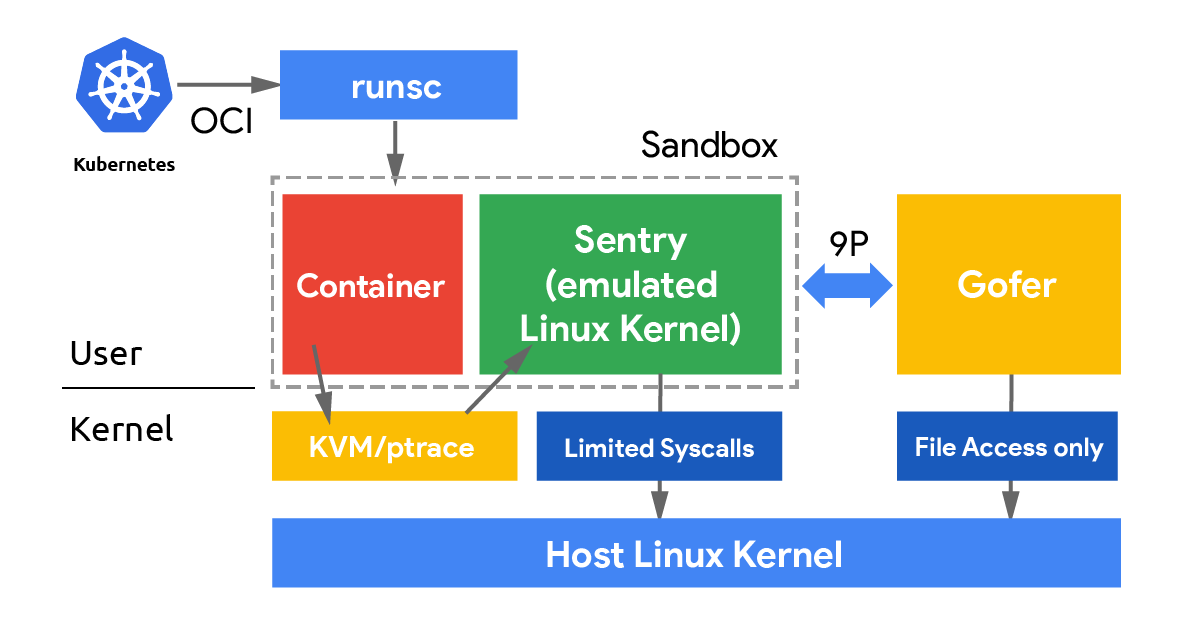
When running containers with gVisor, there are several components that interact with our workload:

The Sentry is the gVisor component that implements all the application kernel functionalities. In particular, from the Falco perspective, the Sentry abstracts the system call layer and manages almost every syscall an application can ever execute. In other words, the Sentry could be seen as an alternative to our drivers: it is in the right position to put together the information contained in the events that our eBPF probe or kernel module usually generates. So, how do we turn the Sentry into a new driver for Falco?
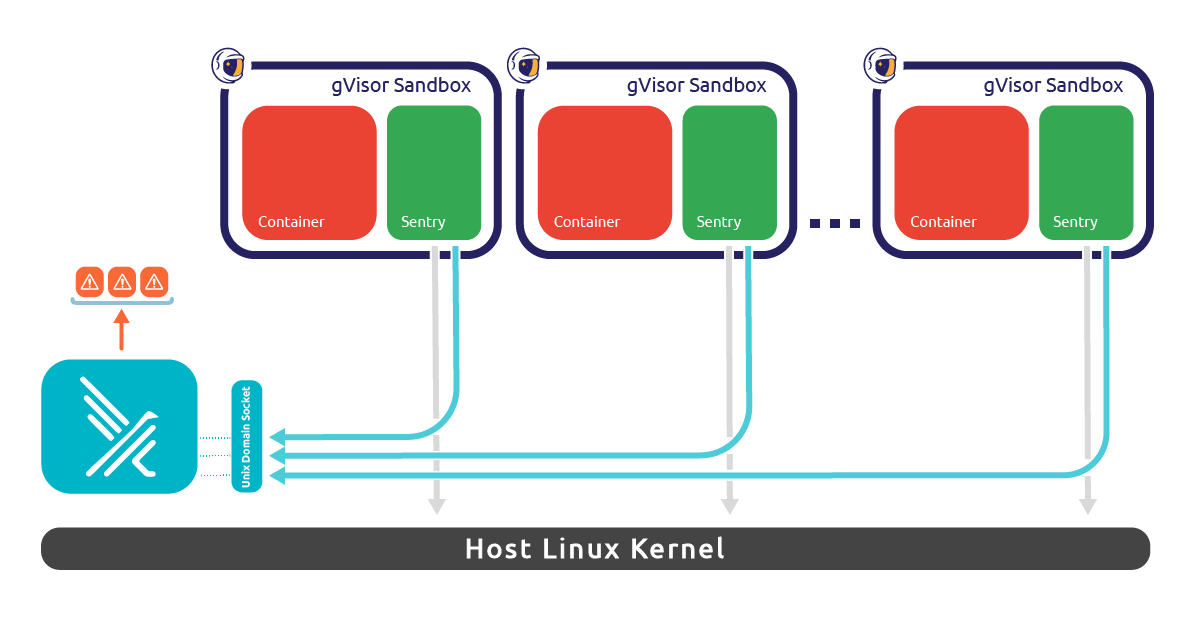
The key observation here is that there is one Sentry process for each gVisor sandbox. If we want them to be able to communicate with Falco, we must set up a form of inter-process communication.
We decided to use a UDS (Unix Domain Socket) to handle the communication between each Sentry and Falco. Falco is acting as a server, and it is responsible for setting up the socket and listening to connections. On the other hand, each Sentry process acts as a client, and it is configured to connect to the endpoint where Falco is listening.
Whenever a syscall gets executed inside the sandboxed application, the Sentry will manage it as usual, plus it will send a message to Falco through the UDS. Messages are serialized through Protocol Buffers so that gVisor and Falco can communicate even if they are written in different programming languages.
Once a message related to a syscall is received, Falco unpacks it and creates the corresponding event in a way that is consumable by our libraries. This way, it is possible to update necessary state information and trigger Falco rules whenever a match occurs!

Setup gVisor sandbox monitoring with Falco
First, install Falco 0.32.1 or above and install the gVisor runsc tool 20220704.0 or above.
You can check the version by running:
falco --version
... which needs to report 0.32.1 or above and:
runsc --version
... which needs to report release-20220704.0 or above.
gVisor needs to be configured to send events to Falco. Download the appropriate configuration file:
$ sudo wget -O /etc/docker/runsc_falco_config.json \
    https://falco.org/blog/intro-gvisor-falco/assets/config.json

# Don't forget to protect this configuration
$ sudo chmod 640 /etc/docker/runsc_falco_config.json
The easiest way to run a gVisor sandbox is by using Docker. For this reason, you need to first configure Docker to work with gVisor via runsc install, and then we're going to update the runsc pod init config configuration for our Docker containers:
$ sudo -e /etc/docker/daemon.json
Then, add the runtimeArgs key with the --pod-init-config= parameter like in the example below:
{
    "runtimes": {
        "runsc": {
            "path": "/usr/local/bin/runsc",

--- Do not forget the comma at the end of the previous line. ---
--- Add the following config, not these instructions.        ---

            "runtimeArgs": [
                "--pod-init-config=/etc/docker/runsc_falco_config.json"

--- End of added config.                                     ---
--- Have I told you not to include these instructions.       ---

            ]
        }
    }
}
Then, restart the Docker daemon to let it use the new configuration:
$ sudo systemctl restart docker
Runtime detection in action
Now it's time to put everything together and see how to use Falco to monitor gVisor sandboxes!
To start monitoring gVisor sandboxes, you can use the -g or --gvisor-config options, passing the path to the pod init config. Falco uses that config file for two main reasons:
- Extract the path of the UDS that needs to be created
- Create a trace session for all the already existing gVisor sandboxes. New ones will directly connect to the running Falco instance as we configured in the previous step.
Run Falco stand-alone
Simply run Falco on the command line:
$ sudo falco --gvisor-config=/etc/docker/runsc_falco_config.json
You're now monitoring your gVisor sandboxes!
Example permament configuration with Systemd
Alternatively, for a more permanent configuration:
$ sudo mkdir /etc/systemd/system/falco.service.d
$ cat << EOF | sudo tee /etc/systemd/system/falco.service.d/gvisor.conf
[Service]
ExecStartPre=
ExecStopPost=
ExecStart=
ExecStart=/usr/bin/falco --gvisor-config=/etc/docker/runsc_falco_config.json
PrivateTmp=false
EOF

$ sudo systemctl daemon-reload
$ sudo systemctl restart falco
The parameter PrivateTmp, set to false, inside the unit config file is needed since /etc/docker/runsc_falco_config.json points to /tmp/gvisor.sock.
Changing the /tmp/gvisor.sock file to /run/gvisor.sock would avoid that we have to use that parameter, and the temporary directory would remain private.
Falco will load the configuration indicating it with a line similar to:
Thu Jul 21 15:41:58 2022: Enabled event collection from gVisor. Configuration path: /etc/docker/runsc_falco_config.json
Now we can run any container with gVisor:
$ sudo docker run --runtime=runsc -it ubuntu bash
If all goes well, the container will start properly configured to be monitored by Falco! To test the detection capabilities, try to trigger a simple rule like Write below binary dir:
$ touch /bin/foo
You will see Falco alerting:
07:47:42.173335167: Error File below a known binary directory opened for writing (user=root user_loginuid=0 command=touch touch /bin/foo file=/bin/foo parent=bash pcmdline=bash bash gparent=<NA> container_id=f6d77af4ee3d image=ubuntu) container=f6d77af4ee3d pid=8 tid=8
Falco and gVisor in action
If you don't happen to have the time to try it right now, here is a short video showing every step to follow.
And if you liked this step-by-step tutorial, don't miss the one that Google has published on the gVisor blog: Configuring Falco with gVisor.
Limitations and syscall support
Falco supports many system call events. For its first release, gVisor does not support all of them. Our focus was to make sure the most important events used in the default rulesets are covered and enough information flows about processes, file descriptors, and connections to maintain consistency of the data throughout the analysis and rule processing. To support an event, the gVisor Sentry needs to emit it and Falco needs to be able to parse and ingest it.
